
Database License
If you have FrontBase 5.2.8 (or newer) installed you can skip this section since FrontBase does not require a license anymore. If you are using an older FrontBase release you might need to get a FrontBase licence free of charge to keep all FrontBase features (live backup,...) enabled. A frontbase license can be obtained from the FrontBase website as follows:- Go to http://www.frontbase.com
- Click on Buy (the title is misleading, FrontBase is available free of charge)
- Click on Licenses
- Click on "E-Enterprise with LookSee"
- Now fill out the "New Customer" form and click on "Continue"
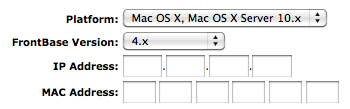 |
Select MacOSX since this is the operation system we are using. Select 4.x for the FrontBase Version unless you have installed another release and then either specify your IP Address or your MAC Address (recommended). You can figure out your MAC address by doing the following:
- Click on the apple in the Mac menu
- Click on "About this Mac"
- Click on "More Info ..." for MacOSX < 10.8, click on Overview - "System Report" for MacOSX >= 10.8
- In the outlineview on the left click on Network
- The MAC Address should be shown in the texview in the lower right corner, e.g. MAC Address: 10:9a:dd:ad:13:0d
 |
Database Backups
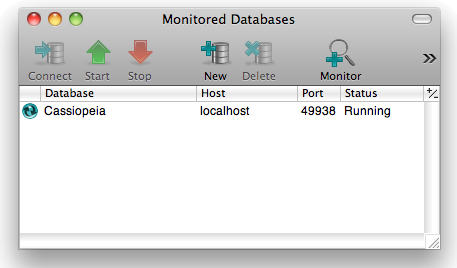
It's a good idea to backup the database from time to time and to put the backup file in a save place. FrontBase maintains the actual database files in /Library/FrontBase/Databases. If you have already been using Cassiopeia with the default database settings there should be a file Cassiopeia.fb in /Library/FrontBase/Databases on your local host. All documents, books, bibliography entries,... are stored in this one database file. Backing up your database could be as easy as creating a copy of this file and store it in a save place. However, this should not be done as long the database is running for obvious reasons. You could stop the database using FrontBaseManager.app or by killing the FrontBase process before duplicating this file. However, FrontBase offers a much more convenient way of backing up data that does not even require you to stop the database. It has a life backup feature that allows to create backups anytime while the database is in use.Open /Applications/FrontBaseManager.app. This application is part of the FrontBase installation. The following Monitored Databases window appears.
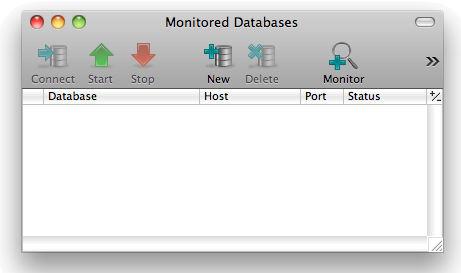 |
Currently no databases are monitored. Click on Monitor and then on localhost. This should give you a list of databases available on localhost (actually the *.fb files in /Library/FrontBase/Databases).
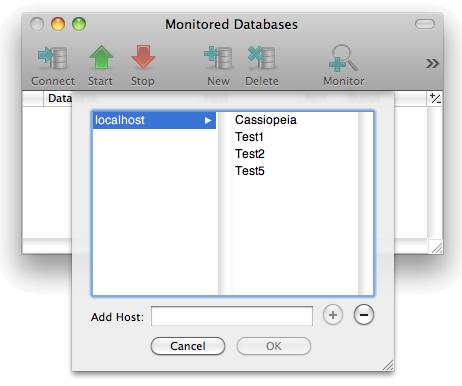 |
Select the Cassiopeia database and click on OK.
 |
Doubleclick on this entry in the tableview in order to create a connection to the Cassiopeia database. You are asked for an account to use for the login. Since we want to create a backup and only the super user _system is allowed to perform backups we keep the default _system in the user field.
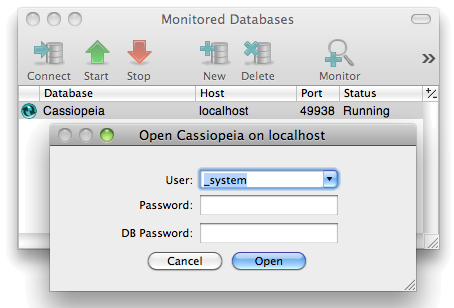 |
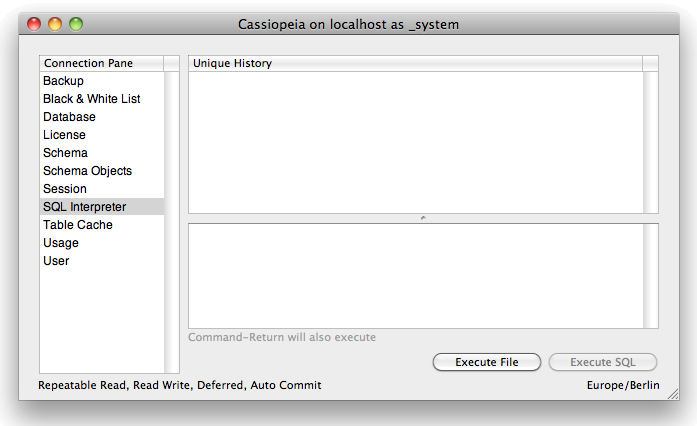
If you have set a password for _system (see below) enter this pasword in the pasword field. If you have not set one yet leave both password fields blank and click on Open. The following database management window appears.
 |
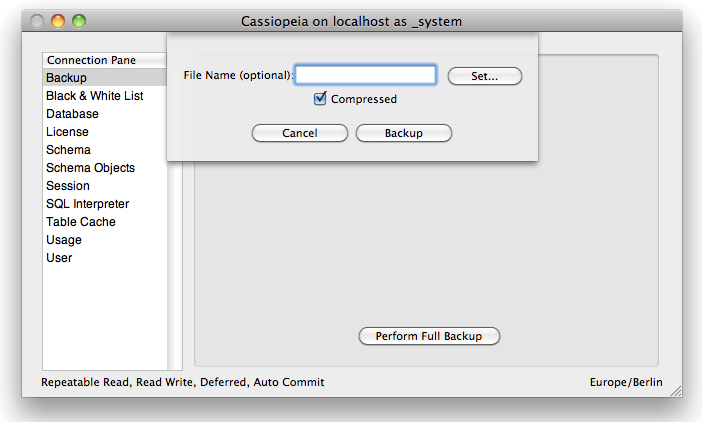 |
Keep the default settings on this panel and simply click on Backup. You should see
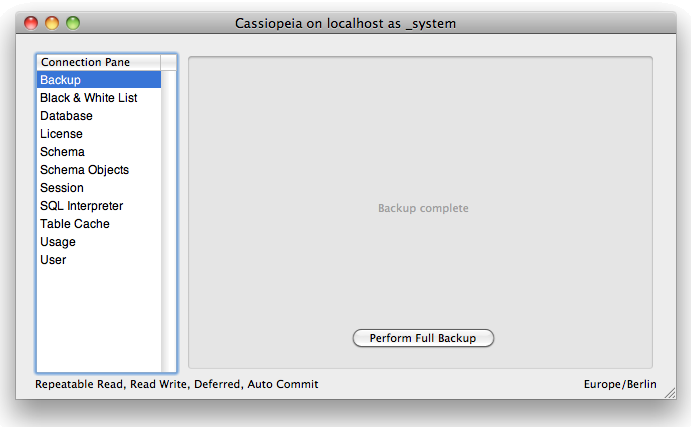 |
after a couple of seconds. FrontBase stores backup files in /Library/FrontBase/Backups. Open this directory in Finder.app and locate the backup file that has just been created.
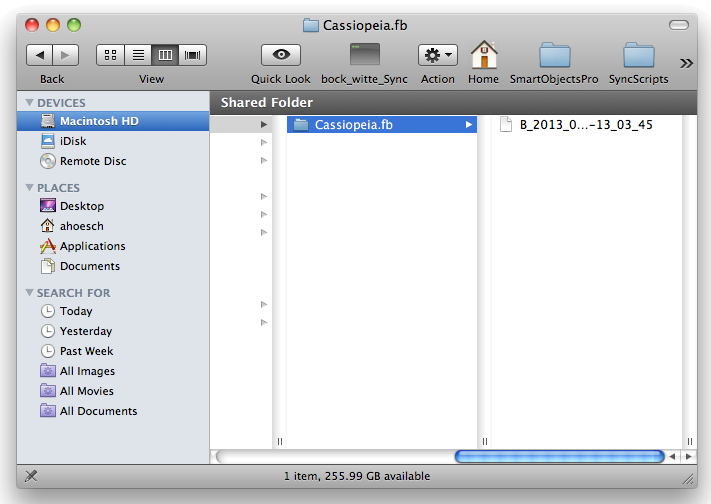 |
You can now copy the backup - either only the last file created or the whole directory /Library/FrontBase/Backups/Cassioepia.fb - to a save place e.g. an USB stick, a DVD or some network volume.
Automating Backups
Manually performing a backup from time to time as described above is fine. Configuring a cronjob to automatically perform a backup once a day is even better. Open a Terminal.app session (/Applications/Utilities) and issue the following commands:
su -
pico /usr/local/bin/backupDatabases
The content of the backupDatabases script could for example be:
#!/bin/sh
find /Library/FrontBase/Backups/Cassiopeia.fb -mtime 10 -exec rm -rf {} \;
/Library/FrontBase/bin/sql92 -v /etc/backup-Cassiopeia.cfg
The second line removes backups that are older than 10 days. The third line is supposed to create the backup. Press Ctrl-x y to save changes and leave pico. Make the script executable
chmod u+x /usr/local/bin/backupDatabases
Now create the file /etc/backup-Cassiopeia.cfg by issuing pico /etc/backup-Cassiopeia.cfg and insert the following lines.
connect to Cassiopeia user _system password '';
write backup compressed;
disconnect current;
This is if you have no password set for the super user _system. If you have set a password as described in Account Management pass the password as shown below:
connect to Cassiopeia user _system password '<password>';
write backup compressed;
disconnect current;
Press Ctrl-x y to save and leave pico. Make sure only root can read this file since it contains secret credentials.
chmod 600 /etc/backup-Cassiopeia.cfg
Set the env variable EDITOR to pico and open the root crontab.
export EDITOR=pico
crontab -e
Add a line
0 0 * * * /usr/local/bin/backupDatabases > /dev/null 2>&1
to this file and save with Ctrl-x y. This line causes a backup to be performed automatically each day at midnight.
News
| 23.04.2023 | Cassiopeia 2.9.0 released |
| 05.10.2022 | Cassiopeia 2.8.3 released |
| 29.09.2022 | Cassiopeia 2.8.0 released |
| 08.07.2022 | Cassiopeia 2.7.0 released |
| 14.04.2021 | Cassiopeia 2.6.5 released |
| 10.02.2021 | Cassiopeia 2.6.1 released |
| 26.06.2015 | Word Processor Comparison |
| 24.06.2015 | Updated Documentation |
| 23.06.2015 | Cassiopeia Yahoo Group |
| 18.06.2015 | Advanced Data Security |
| 11.05.2015 | Cassiopeia Overview |
| 08.05.2015 | Exporting to files |
| 14.05.2013 | LaTeX and HTML Generation |
| 08.05.2013 | Example Paper released |
| 26.04.2013 | Co-editing in a workgroup |
| 16.04.2013 | Equation Editor Quick Reference |
| 12.04.2013 | Equation Editor |
| 04.04.2013 | Links and Bibliography |
| 01.04.2013 | Books |
| 30.03.2013 | Documents |
| 28.03.2013 | Simulations |
| 16.03.2013 | 2D Graphs |
| 10.03.2013 | Symbolic Algebra |
| 08.03.2013 | Getting Started |
| 07.03.2013 | Installation and Setup |
White Papers
| 13.10.2015 | 01 Writing documents |
| 15.10.2015 | 02 Using the equation editor |
Youtube
| 08.07.2022 | Installation & Getting Started |
| 14.04.2021 | Animating Wave Functions |
| 26.01.2016 | Keystroke Navigation |
| 22.10.2015 | Equation Editor Demo |
| 19.06.2015 | Equation Editor Tutorial |
| 10.06.2015 | Sections and Equations |
| 09.06.2015 | Getting Started |
| 09.06.2015 | Damped Oscillations |
| 29.05.2015 | Solving equations |
| 13.05.2015 | Privileges and Links |
| 19.06.2013 | Magnetic Field |
| 14.06.2013 | Creating Documents |
| 10.06.2013 | Vector Algebra |
| 30.05.2013 | Differential Simulations |
Contact
Smartsoft GmbH Advanced Science Subdiv.Support: support@advanced-science.com
